Showing posts with label build. Show all posts
Showing posts with label build. Show all posts
Thursday, February 20, 2014
Useful Tips on How to Build Deck Railings
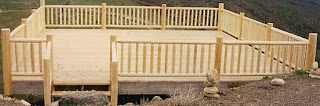
The deck on a house is a floored area that extends from the house and is normally roofless. It can be situated at the back, the front or to the side of the house. Deck railings provide a deck its style and distinctiveness and are very crucial in keeping persons safe in that, they are both functional and decorative. In being decorative, they are attractive components adding design to a house and are practical as they enhance protection. It is usually required for decks that are higher than thirty inches above the ground and also for stairs that comprise of five or over steps. The height of a deck railing normally ranges between thirty and forty inches even though specific areas have particular constraints. Standard builder deck railings are the simplest types to make and install.
Deck railings contain a top rail and a bottom rail, side rails and may also contain bulging posts, balusters and hand rails. They come in a variety of styles and can be made from different materials including iron, aluminum, natural timber, wood composite materials and also transparent glass. They are readily accessible, but believe it or not, you can make a deck railing by yourself. Are you curious? Heres how:
Materials Required:
2 x 2 inches wood
Carriage bolts
2 x 4 inches wood
2 x 6 inches wood
Galvanized screws
1 can varnish stain
Tools Required:
Wood saw
Electric drill
Screwdriver
Paintbrush
Knife
Instructions:
1. Get rid of any wood or material that is connected to the deck so that you will locate the rim joist which is the outermost part of the flooring.
2. Use 2 x 6 inches wood to create the upper railing and attach it for the time being to the deck by using a screwdriver and galvanized screws.
3. Using your wood saw cut the 2 x 2 inches wood to the relevant height for the spindles.
4. Use the electric drill and make two holes into every spindle. One hole must be drilled approximately 1 1/2 inches from the base of the deck. The other hole should be made 1 ½ inches from the top and the outside of the deck. These holes must be smaller than the carriage bolts.
5. For strength and firmness, bolt the spindles into position with the carriage bolts.
6. Cut the 2 x 4 inches wood with the saw to the correct lengths to make spindles. Ensure that they are the same lengths as any mistake will be obvious.
7. Using your screwdriver, join the sections you cut to each spindle using the galvanized screws.
8. Permanently screw the railings to the deck at this stage. Screw through the bottom to raise the railing.
9. Use knife to pry open the can of varnish stain.
10. Take paintbrush and slightly dip it into the can of varnish stain to soak up a little.
11. Paint the railings by applying level strokes with the paintbrush and continue until the total railing is finished.
Tips and warnings:
Always construct your deck railings in compliance with rules regarding them in your area.
Spindles should be spaced no more than nine inches apart for security.
Carefully measure at every step to get a look that is as skilled as possible.
Painting or staining the wood seals it to make it more durable.
The railing should be about 4 inches high but allow added length so that it flushes with the bottom outside section of the deck.
The stairs leading to the deck must be in position to give easy access to the deck.
Select a railing style that suits is within your means and blends with the model of your house.

Wednesday, February 19, 2014
Chicken Coop Ventilation Learn How to Build a Chicken Coop

If youre looking for information on how to build a chicken coop, its going to be very important that youre using proper ventilation at all times. Individuals who arent adding ventilation inside their chicken house will find that the coop takes on a very bad smell, and this can actually make it hard to be around the coop - little own live in it for your chickens.
Here is what you need to know about chicken coop ventilation.
Here is what you need to know about chicken coop ventilation.
Utilize Your Windows
The windows in your chicken coop will be ideal for helping to add ventilation to the house since these are what will keep fresh air circulating as well as add enough light to keep the coop lit.
Ideally you want to get a window that can easily adjust because this will allow you to only open it halfway if the weather isnt quite as warm. If you arent going to use windows for ventilation purposes, then you may want to consider instead adding small vents into the sides of the walls to ensure that enough air flow is circulating throughout the chicken coop.
Be Sure The Windows Are Facing The Wind Direction
Now, with the windows, its not enough to just place them on the coop. You also should be taking steps to make sure that they are facing the right direction so that the wind does actually blow through the chicken house. Many people put time and effort into planning good windows, but then dont place the windows where the wind is going to blow. This is a huge mistake from a building standpoint. If theres one how to build a chicken coop tip to take home, this is it. Direction is important.
Double Check The Temperature Inside The Chicken Coop
Finally, the last thing that will be important for you to do is to make sure youre monitoring the temperature level in the chicken coop. You dont want it to be too high or too low since anywhere outside of the comfortable range for your chickens will make them uncomfortable and influence their ability to lay eggs properly.
So, be sure youre keeping these points in mind when looking at how to add ventilation to your chicken house.
Monday, February 17, 2014
Build a Simple Chicken Coop DIY Style
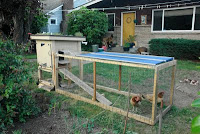
Budgeting for Your Chicken Coop
It is rather easy to spend a great deal of money building a chicken coop for your backyard flock. If you have the finances and you feel the need to splurge, you can rack up quite a bill with new materials, shingled roof, painted walls and all the other elements of a fancy coop.
However, you can also take a much cheaper route and build a more than adequate hen house with reclaimed and recycled materials. For example, you can use scrap wood from old pallets or shipping crates, which should cost you close to nothing. You do not have to worry about aesthetics because the rustic look of a coop built from pallets is somewhat charming all on its own. Besides, you can always paint it if you like, or cover it with inexpensive or recycled plywood and no one will be any the wiser.
Chicken Coop Efficiently Self-Sufficient in a Few Easy Steps
If you build a simple chicken coop, it could very well be the most fun you ever have in your life. You will have the benefits of a small farm right in your backyard. Raising chickens provides you with a way to recycle food scraps and fertilize your yard. Best of all, when you raise your own chickens, you get a certain sense of pride, accomplishment and independence that is rare in any other endeavor.
The steps to build a simple chicken coop are easy. You find an easy design that will suit your needs. Several great designs are available online. Next, you collect the materials that you need to build your coop. You can buy new materials, or recycle old or scrap material to save money. Finally, fill your coop with the flock of your choice and enjoy!
How To Build A Chicken Coop
Sunday, January 26, 2014
Build a Case for your Books with your Friends
Its Wood Whisperer Guild Build time again. Because Marc is currently dealing with a limited shop as his new one is built, the current build is a one or two sheet plywood bookcase. Its a useful project that makes great use of one of my favorite materials: man made sheet goods. Unlike my projects that often leave the sheet goods exposed, Marc will show you how to hide it and make a damn fine bookcase.
Previously Ive talked about The Wood Whisperer Guild and why I feel its a must for any online woodworker. Now, you can watch me go on about the Guild, and why its such a great experience to build a project with fellow guild members. As you watch, Im the one who looks like a zombie.
Read More..
 |
| The One & Two Sheet Bookcase |
Subscribe to:
Posts (Atom)